Create Routes and Roadbooks
This guide explains how to create your first route and roadbook with SEEKERS. The entire workflow — from import and generation to route and roadbook editing — is available in both SEEKERS Studio (the web version) and the SEEKERS mobile app. You can start a route on one device and keep editing it on the other.
In practice, building a good roadbook has three phases: scouting the track, generating the initial roadbook, and refining it later during a reconnaissance ride. This page focuses on the practical second step: creating the initial route and roadbook and preparing it for navigation or an event.
Quick links:
SEEKERS StudioSEEKERS Studio is the web version of SEEKERS and runs in any modern browser. The SEEKERS mobile app runs on your phone or tablet. Both versions share the same account, the same data, and the same core editing tools — you can import, generate, edit routes, and edit roadbooks on either platform. Studio is usually more comfortable for longer editing sessions on a big screen; the mobile app is the right place when you want to prepare or adjust a roadbook in the field. Before creating the roadbook, make sure your source track is already available. A typical starting point is a scouted track that you recorded with SEEKERS on mobile or a GPX file from another device.
|  |
Generate Initial Roadbook
To generate the roadbook, open the track and use the Add Roadbook button — this works the same way in SEEKERS Studio and in the SEEKERS mobile app. SEEKERS will ask whether the track should be converted into a route. After confirmation, the system matches the source track to the road network, detects junctions and off-road sections, and generates the initial roadbook structure.
- Masked waypoints in off-road sections: The algorithm checks for significant direction changes in off-road sections. A masked waypoint is added, and the note at the waypoint gives the CAP heading to the next note.
- Notes with CAP heading in off-road sections: If there is only a small change in direction in an off-road section, a note with a CAP heading to the next note is added. It can be tricky to reach the next note, but a waypoint will follow soon to verify you are on the right line.
- Notes for each maneuver on road sections: If the track follows a road, a note is generated for every turn.
- Verification notes on road sections: While following a road, a note is generated when the route crosses a road that is larger than the one currently being travelled. A verification note is also added — even for crossings of the same size — whenever the previous note is more than 3 km away (500 m on short tracks).
- Tulip for each note: A tulip in FIA/FIM style is generated for each note.
Generation is identical in Studio and in the mobile app. You can trigger it wherever it fits your workflow best — for example on mobile right after a scouting ride, or later in Studio on a larger screen.
Route EditingAfter generation, review the route carefully. The route editor — available in both SEEKERS Studio and the SEEKERS mobile app — helps you verify whether the automatically matched route still reflects the intended line of travel.
The key idea is simple: first generate automatically, then correct the route wherever local knowledge or organizer intent requires a different line. Studio is comfortable for precise edits on a large map; mobile is ideal for quick on-site corrections during reconnaissance. | 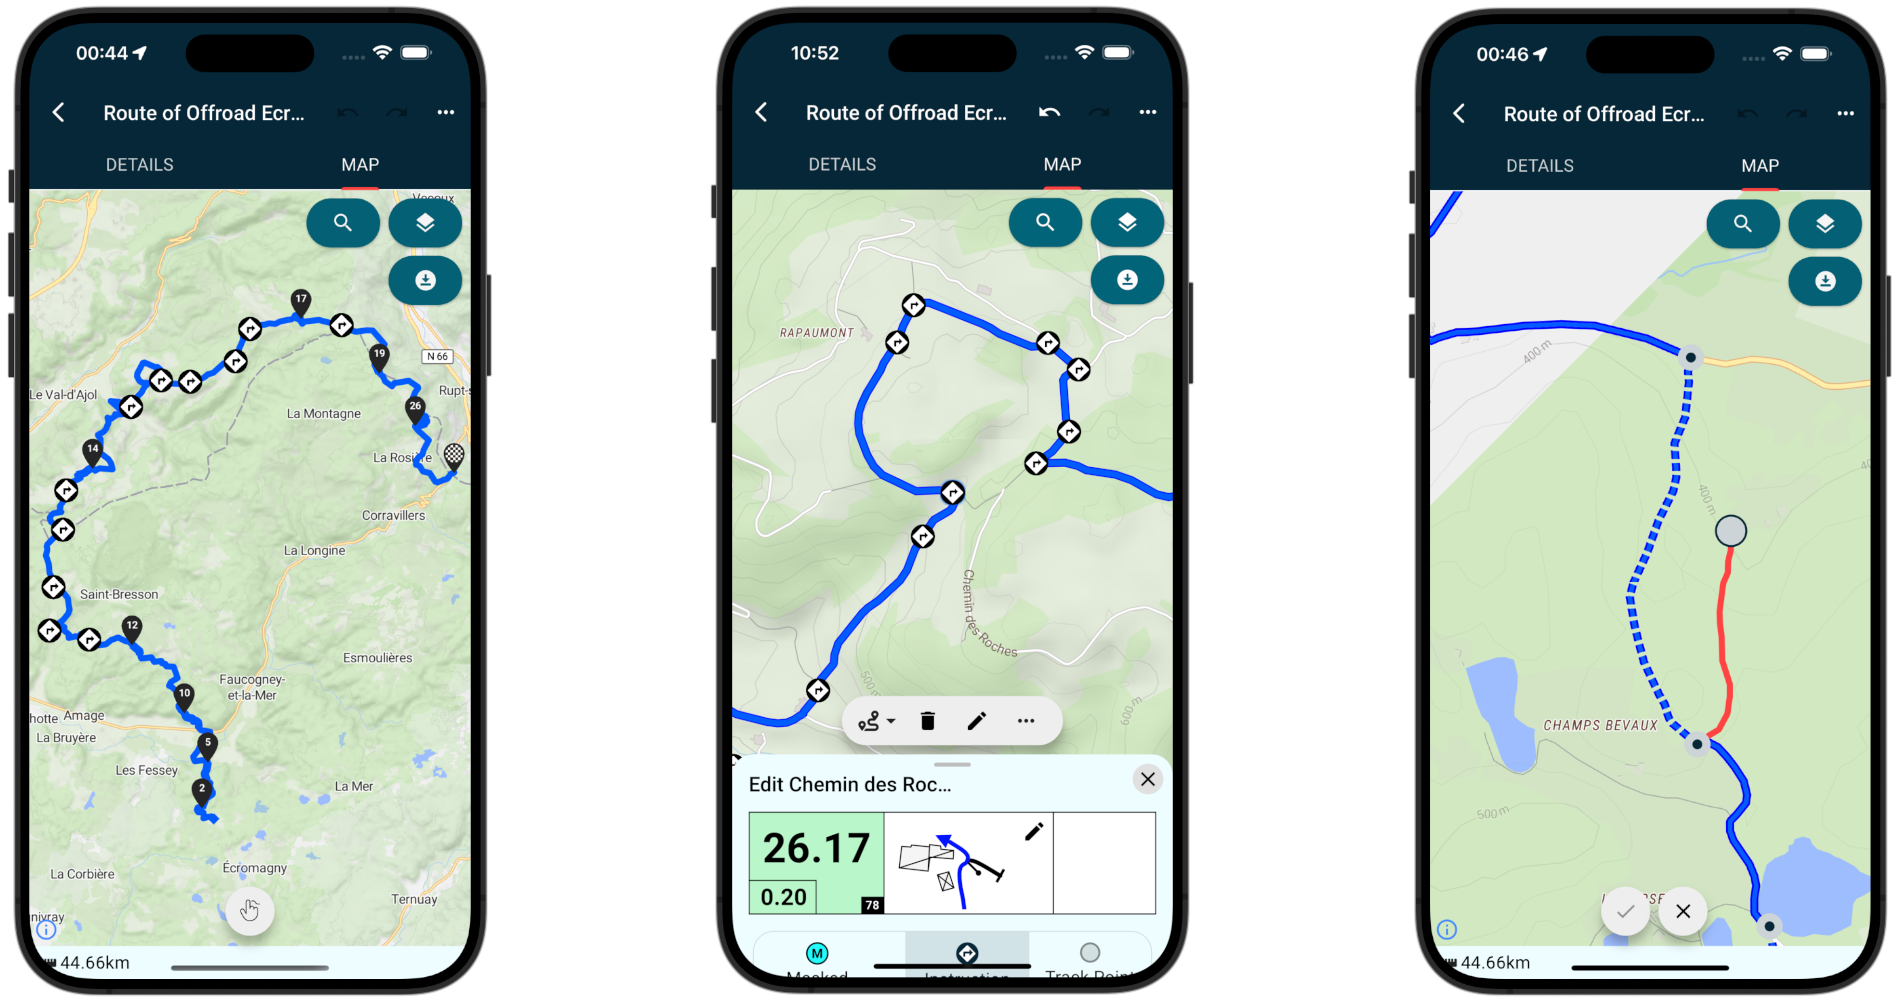 |
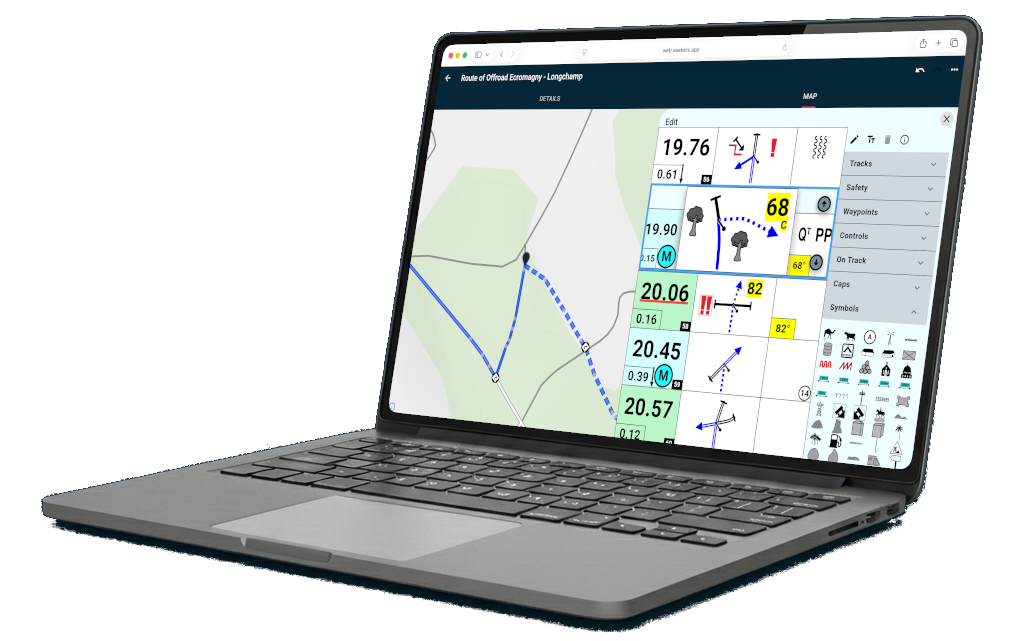
Roadbook EditingOnce the route is correct, refine the roadbook itself. The roadbook editor is available in both SEEKERS Studio and the SEEKERS mobile app — you can open an existing note, inspect the generated tulip, and add the extra information riders need in the field, from either device.
Speed zones can also be added in the editor. Place a note where the speed limit should begin, assign the DZ waypoint and the speed limit, then add the corresponding end point with an FZ waypoint where the limit should stop. This works on Studio and on mobile in exactly the same way. | 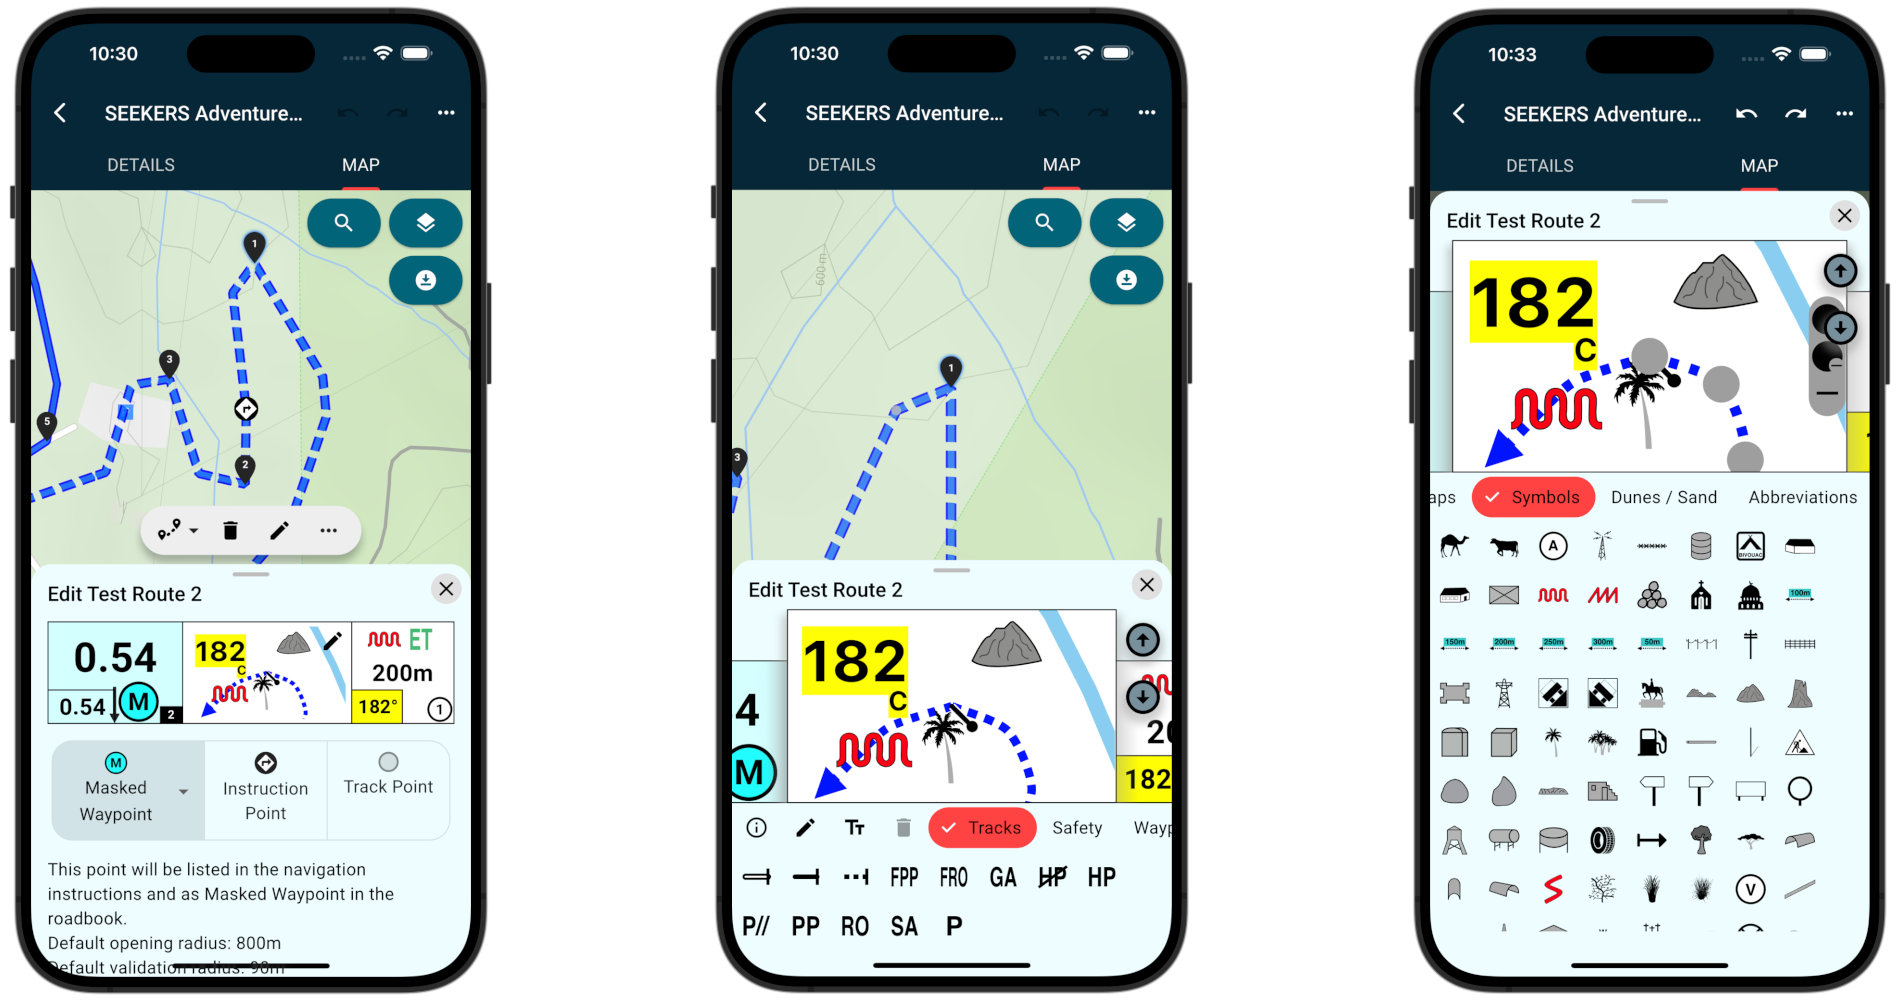 |
Neutralization, Transfer and Refueling Planning
When designing an event route, neutralization and transfer zones need to be placed clearly so riders understand when the competitive part stops and when it starts again. These zones can be placed and edited in both SEEKERS Studio and the SEEKERS mobile app.
According to FIA/FIM Appendix III §5.13 (Zone Signage), each neutralization and transfer zone has three layers of information that must stay consistent: the roadbook box (waypoint code, distance and diagram), the physical ground sign placed on the track, and the NAV/SYS indication shown to the rider by the navigation system. SEEKERS covers the roadbook box and the NAV/SYS side directly — the physical ground signs are placed by the organizer on site.
In SEEKERS, time and distance are neutralized when the rider enters the DN validation radius of 90 meters. Time and distance start counting again 25 meters after the FN waypoint. After validating the DN or DT waypoint, the restart time is shown in the GPS as T:MM:SS in the bottom-right area of the GPS sheet. The timer counts down to the restart time and then counts upward again.
SEEKERS also shows a RESTART message above the roadbook with the countdown as soon as a participant enters the 25-meter radius of the FN or FT waypoint. In line with §5.13, the waiting line is placed 100 m before FZ and a vehicle must not cross it earlier than 60 s before its assigned START time; it then stops at the RESTART line and waits for the start signal.
- Best practice is to start the neutralization around 200 meters before the actual stopping point, such as a patrol or control station.
- End the neutralization around 100 meters after the stopping point to reduce confusion and limit problems caused by pure GPS signal inaccuracy.
- Early departure is penalized with 1 minute plus the time assigned to the neutralization zone.
- A late start is treated as a start on time and does not receive an extra penalty.
The two scenarios below follow the FIA/FIM signage tables in Appendix III §5.13 and cover the combinations that are most relevant when planning an event roadbook in SEEKERS.
Neutralisation with Refuelling
Used when the neutralization zone also contains a refuelling area and a passage control. The rider enters the speed-limited zone at DN, refuels, waits at the RESTART line and departs on the start signal.
| Zone / Control | WP | Distance box | Diagram box | Description box | NAV GPS / Instruction |
|---|---|---|---|---|---|
| Start Neutralisation / Start Speed Control Zone | DN | T:20 min | Neutralisation time countdown and Speed Zone Alerts; vehicle speed monitored until FINISH of Neutralisation. | ||
| Refuelling (200 m after DN) | | Refuelling takes place inside the neutralised zone; no timing impact. | |||
| Waiting before RESTART (100 m before FZ) | | Vehicle to cross this line not earlier than 60 s before its START time. | |||
| Stop at RESTART line | FN | | | Vehicle stops at this line and waits until the START signal is given (time countdown is at 00:00). | |
| Finish Neutralisation (25 m after FN) | FINISH Neutralisation — Restart time countdown ends, timing and distance resume. |
Neutralisation or Transfer (Road Section Only)
Used on pure road sections where the competitive part is paused — either as a neutralisation inside a stage or as a transfer between two selective sections. There is no speed control zone and no passage control, only the start/stop/restart logic.
| Zone / Control | WP | Distance box | Diagram box | Description box | NAV GPS / Instruction |
|---|---|---|---|---|---|
| Start Neutralisation or Transfer | DN / DT | T:15 min | START Neutralisation or Transfer — time countdown begins (e.g 15 minutes). | ||
| Waiting before RESTART (100 m before FN / FT) | | Vehicle to cross this line not earlier than 60 s before its START time. | |||
| Stop at RESTART line | FN / FT | | Vehicle stops at this line and waits until the START signal is given (time countdown is at 00:00). | ||
| Finish Neutralisation or Transfer (25 m after FN / FT) | FINISH Neutralisation or Transfer — Restart time countdown ends, timing and distance resume. |
For all additional FIA/FIM symbols and naming conventions, see the Roadbook Lexicon.
Saving, Sharing and Mobile Use
After editing, go back to the route details and add the general information needed for the route or event. Because SEEKERS Studio and the SEEKERS mobile app share the same backend, every save is automatically available on the other platform. You can keep the route private for yourself or share it explicitly with a group.
- Set the route access level according to your needs and preferences:
- Use private access if the route should only be available to selected users or event participants.
- Use only Seeker access if the route should only be available for active participants of the Seekers community. This means the route can be found by all users but will be obfuscated. Only those who actively share other routes (earning Seekers points) can reveal the real location and route. Choose this option to earn own Seekers points if someone else reveals your route for navigation.
- Use public access if the route should be available to all users.
- Save the route and roadbook to upload them to the server.
- After upload, the route becomes available on every device logged into your account — Studio and mobile.
- Start navigation on mobile, or continue editing in Studio, or share the route with groups and event participants.
- If you share the route with a group, all members of the group can access it on their devices and use it for navigation.
- If you make further edits after sharing the route in a group, a push notification is sent to all group members to inform them about the update.
This makes the workflow practical for events: prepare on the desktop, fine-tune on mobile in the field, upload once, then navigate or distribute — all from the same route and roadbook.
For more informaiton about groups and sharing, see Groups & Events.


© SEEKERS® by Janiko Naber